Hello PhoneGap (Mac Instructions)
Download:
Java SE JDK
Macs come with Java JDK. To double check, in xterm, type "javac
-version"
if you get something like "javac 1.6.0_26, you already
have the java jdk
Otherwise get the Java SE JDK -
http://www.oracle.com/technetwork/java/javase/downloads/index.html
Android SDK
We will install this from a CD/USB stick to save time, but
otherwise you would go here: http://developer.android.com/sdk/index.html
Eclipse IDE for Java EE Developers
We will install this from a CD/USB stick to save time, but
otherwise you would go here:
http://www.eclipse.org/downloads/
Install:
unzip the android-sdk_macosx
copy the folder to applications
open android-sdk-macosx/tools/android
Install the Android SDK Platform-Tools and the following from Android 2.2 (API 8): SDK Platform, Samples for SDK, Google APIs by Google Inc.
.png)
Note that Windows users should also install the Google USB Driver Package.
See these links for more information about Windows USB device drivers for Android phones:
http://developer.android.com/sdk/win-usb.html
http://developer.android.com/sdk/oem-usb.html
Android 2.2 (API 8) is sufficient to run PhoneGap 1.3. If future versions of phone gap require higher Android versions you can come back to the SDK Manager to install other
packages, but it's very time consuming to install many
packages, so we won't do it in class.
Install the ADT plugin:
http://developer.android.com/sdk/eclipse-adt.html#installing
Open Eclipse and go to Help > Install New Software
Paste http://dl-ssl.google.com/android/eclipse/ into the
"Work with" field
Hit Add and enter "ADT Plugin" into the name field
Select Developer Tools and hit Next
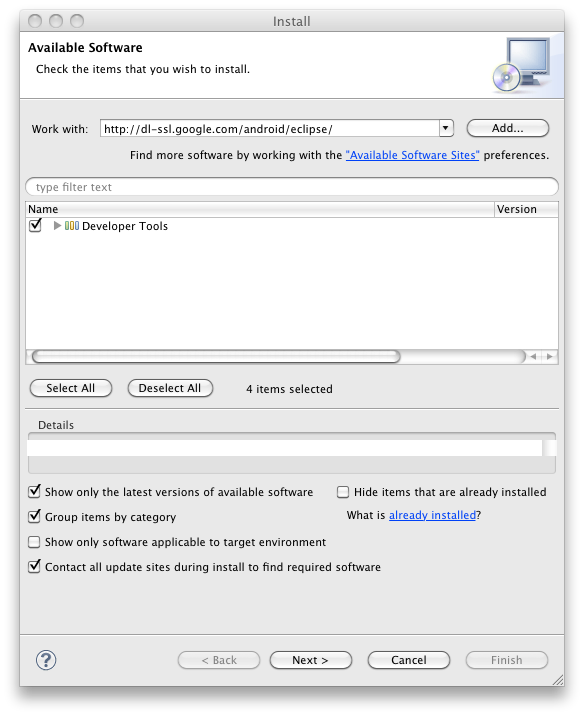
Walk through the screens and agree to the license to
finish the installation.
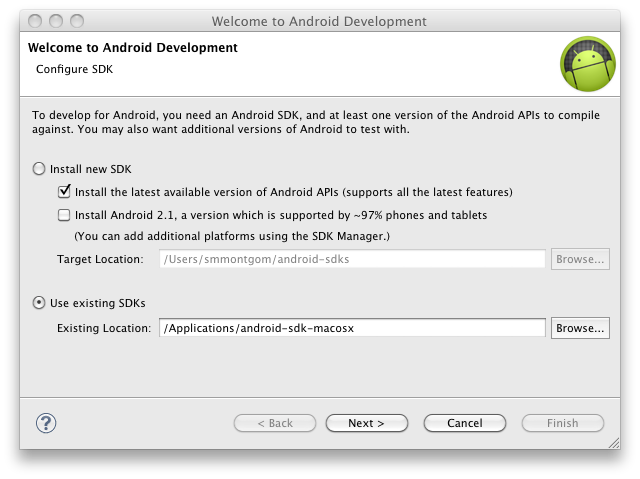
Restart Eclipse and point it at the Android SDK
directory
Install PhoneGap Eclipse Plugin
http://www.mobiledevelopersolutions.com/home/download
Help > Install new Software...
Paste https://svn.codespot.com/a/eclipselabs.org/mobile-web-development-with-phonegap/tags/r1.2/download
into the "Work with" field
Hit Add and enter "MDS AppLaud 1.2" into the name field
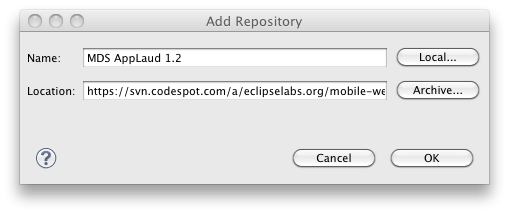
Navigate the screens and restart Eclipse
Creating Your First PhoneGap App
Click on the PhoneGap icon
Create minimal PhoneGap project
Call it HelloPhoneGapMin
Choose Android 2.2
Enter a package name, e.g.
com.produceconsumerobot.phonegap.hello.min (starting with
your domain name reversed is a common standard to assure
uniqueness from other people's packages)
Things to point out:
AndroidManifest
"package" is the unique identifier for an app on your
phone and on the Android Market. If two projects share a
package name, they will overwrite each other when you
deploy to a phone.
"versionCode" is an internal versioning number for you,
the developer, to keep track of app versions
"versionName" is a public version number you can show to
people who download/use the app
"minSdkVersion" is the oldest phone version you can run
with this app. (8=Android2.2=froyo). For this class, build
to 2.2 so I can run it on my phone.
"supports-screens" are the screens supported. Note the red
x is caused by the fact that xlargeScreens is not a
feature supported in SdkVersion 8.
"uses-permission" sets up all the permissions your app
wants to use. PhoneGap uses a lot of features and requires
a lot of permissions.
"application" sets up properties of your application.
"debuggable" sets whether your app can be programed to a
phone from the Android debugger
"icon" points to the launcher icon for the app in res/drawable-xxxx/ic_launcher.png
"label" sets name of the app appearing in the launcher by
pointing to a string in res
"activity" is how traditional Android breaks up different
"pages" in an app, but we're going to do things a little
differently in PhoneGap.
"intent-filter" determines how this app can be called from
other apps
<action android:name="android.intent.action.MAIN" />
<category android:name="android.intent.category.LAUNCHER"
/>
Set the activity that's called from the launcher
".HelloPhoneGapMinActivity" refers to a src java file
HelloPhoneGapMinActivity in the current package (com.produceconsumerobot.phonegap.hello.min)
"import com.phonegap.*;" imports the PhoneGap libraries we
need
"extends DroidGap" states that this activity is a
particular type (laid out in the /libs/phonegap.jar
library)
"onCreate" is run when the activity starts
"super.onCreate" loads up all the stuff in the DroidGap
class
"super.loadUrl("file:///android_asset/www/index.html");"
loads up an html file at assets/www/index.html
"index.html" looks very much like a standard webpage that
is using a special library "phonegap-1.3.0.js" to access
your phone's special functions, like the accelerometer and
GPS, etc.
Running your App
Setting up an Emulator:
Click on Android Virtual Device Manager
Click New
Name your device somthing like "Android2_2Min"
Click Create AVD
Start your new virtual device.
Click on your project "HelloPhoneGapMin" and go to Run > Run
As > Android Application
Take screenshots to document your app - http://guides.macrumors.com/Taking_Screenshots_in_Mac_OS_X
Programming your phone:
http://developer.android.com/guide/developing/device.html
Go to Window > Show View > Other > Android/Devices
Run the app
Taking screenshots from your phone:
Go back to the Devices tab and click on the camera
Rotate and copy to take screenshots
Hello HTML
HTML stands for Hyper Text Markup Language
HTML is not a programming language, it is a markup language
Elements and HTML Structure
An HTML document is made up of a collection of nested HTML elements. An html element has the following structure:
<element name>Content goes here</element name>
The <html> element encapsulates the entire document and contains elements <head> and <body>.
The head contains a variety of information including the <title> of the page, <meta> information about the page and <script> that will be called from viewing of the page.
<!DOCTYPE HTML>
<html>
  <head>
    <meta name="viewport" content="width=320; user-scalable=no" />
    <meta http-equiv="Content-type" content="text/html; charset=utf-8">
    <title>Minimal AppLaud App</title>
    <script type="text/javascript" charset="utf-8" src="phonegap-1.3.0.js"></script>
    <script type="text/javascript" charset="utf-8">

    var onDeviceReady = function() {
      document.getElementById("devready").innerHTML = "OnDeviceReady fired.";
    }; function init() {
    	document.addEventListener("deviceready", onDeviceReady, true);
    }
    </script>
  </head>
<body onload="init();" id="stage" class="theme">
  <h2>Minimal AppLaud App</h2>
  <p>Your app goes here.</p>
  <p>
  	<span id="devready">onDeviceReady not fired.</span>
  </p>
  </body>
</html>
The body contains what we want to show up in the browser. Inside of the body, other elements "markup" or provide meaning and structure to the content.
- <h2>, for example, says that this piece of text is a header of level "2" (where h1 is the highest).
- <p>, demarcates a paragraph
- <em>, adds emphasis
- <strong>, adds even more emphasis
A good list of HTML elements can be found here - http://www.joedolson.com/articles/2008/04/guide-to-semantic-html/
And a good general resource for HTML, CSS and Javascript is
http://www.w3schools.com
Note that each element stacks in a hierarchy and is terminated by the </element> tag.
Attributes
HTML elements can also be given attributes that will determine their look and behavior. The organization is <element attribute-name="value">Content</element>. For example the "anchor" or link element has an "href" attribute.
<a href="http://www.produceconsumerobot.com/">ProduceConsume</a>
In the above example the anchor element is giving "ProduceConsume" the attribute of href (or hypertext reference) so that when you click on it, you're linked to my webpage.
Another common html element is the <img> element, which says "hey browser, an image goes here, go back to the server and get it".
Let's add an image to our PhoneGapMin project. First create an images folder in assets/www/. This folder isn't necessary, you could put images directly in the www/ folder, it's just a way of organizing our app content. Now find an image (.jpg, .png, .gif) you want to put in your app and copy it to the images folder. Then add the following to your index.html:
<img src="images/myImage.png"/>
Run the app, et voila.. you have an image in your app.
Note the "src" inside the img element is an attribute that tells the browser where to look for the image. Also note that the img tag is a special case because it is a "content-less" element, so instead of closing with </img> it just closes with />, skipping over the content section of the element.
Another useful content-less element is the <br> element, which inserts a simple line break.
Generic Elements
Some HTML elements are "generic elements", <div> and <span>. These elements don't inherently change the format of your page at all, but can be set up with attributes that alter the appearance and function.
For example, look at the <span> in the PhoneGapMin project:
<span id="devready">onDeviceReady not fired.</span>
Note the "id" attribute. Also note the javascript code at the top of the document:
document.getElementById("devready").innerHTML = "OnDeviceReady fired.";
This is finding the element with id "devready" and replacing the HTML inside of that element with OnDeviceReady fired. As you can imagine, this is a powerful tool for creating dynamic apps.
Commenting!
Even more powerful than generic elements is you ability to read your code and share it with others (like your professor)! Good comments are invaluable for your success as a programmer and in this class. An example of a useful comment might be:
<!--devready changes text when onDeviceReady is called-->

                            <span id="devready">onDeviceReady not fired.</span>

